Buy now, pay later
Buy now, pay later

Enjoy your Lightswing® right away

30 days to change your mind

So you have time to think about it

Order before 4pm for same day shipping

We'll prepare your order the same day

Essential tools & tips for mounting your Lightswing®

Ready to hang the Lightswing® at your home? Make sure you are well prepared and have the right tools at hand. We have listed everything you need below.

Discover Lightswing®
tools for mounting the Lightswing
Photo of the lightswing being mounted to the ceiling.

You will need these tools.

To attach the Lightswing® to your ceiling, it is useful when you already have the following tools ready:

  1. A fitting screwdriver. You need this to attach the power wires to the connector of the Lightswing®. In addition, you can use the fitting screwdriver to attach your lamp to the Quick Release of the Lightswing®.
  2. Marker and pencil. You can use a pencil to draw on the ceiling where the drill holes should be. You use a marker to mark on your lamp cord how high the lamp should hang.
  3. A stripping pliers. You use it to cut the cord at the right height. In addition, the stripping pliers are ideal for stripping the lamp cord so that the power wires become visible and can be screwed into the crown stone of the Quick Release.
  4. Cordless screwdriver/screwdriver. You need this for screwing the surface-mounted ring and / or the Lightswing® to the ceiling. This can also be done with the help of a cordless screwdriver. You can also use the screwdriver to unscrew the screws in the Quick Release.
  5. A drill. You need the drill to drill 4 holes in your ceiling. You can conveniently draw the position where the holes must be drilled using the drilling template that is included free of charge with the Lightswing®.

Buy the right screws and plugs.

The range of screws and plugs is enormous. When buying screws and plugs to mount the Lightswing® you should pay attention to a few things. The right choice depends first of all on your ceiling type. For a plaster ceiling you need different plugs than for a concrete ceiling so, match the right plugs well to your ceiling type.

Suitable screws for the Lightswing® must meet two things: the screw head must be flat with a maximum head width of 7mm. In addition, it is important to match the screws to the plugs you use. Take a good look at the thickness and length of the screw.

Good preparation…

Is half the battle! Have you gone through the manual, collected the right tools and bought screws and plugs? That’s great! You’re ready to attach the Lightswing® to your ceiling!

Shop Lightswing®

Choosing a pendant light for the Lightswing®: 3 things to look out for

Do you want to choose a suitable pendant light for the Lightswing®? In this blog we tell you which 3 things you should check, so that your chosen pendant light is suitable for the Lightswing®.

Lightswing® Single 90 cm: max. 3.5 kg per pendant lamp

Lightswing® Twin 90 cm: max. 3.5 kg per pendant lamp

Lightswing® Single 110 cm: max. 2.5 kg per pendant lamp

Lightswing® Twin 110 cm: max. 2.5 kg per pendant lamp

Lightswing Single white in a luxury dining room

1. Check the weight of your pendant light

The first step is to check the weight of the pendant light. The maximum weight you can hang on the Lightswing® depends on the length of the Lightswing®. The maximum carrying weight of the Lightswing® 110 cm is lower than the maximum carrying weight of the Lightswing® 90 cm. This is because the distance between the attachment point and the point where the pendant lamp is larger at the 110 cm.

We have the max. carrying weight per Lightswing® listed for you:

2. Check the cord of your pendant lamp

If you want to attach a lamp to the Lightswing®, it is important that this lamp only has one cord where the power wires run trough. To attach your lamp cord to the Lightswing®, you need to cut the cord a bit and attach the wires to the Quick Release. Does the lamp have an extra (decorative) cable or chain in addition to one cord? You can also attach it to the Lightswing®. Check out how to do that here!

3. Avoid pendant lights with a built-in dimmer or transformer

In some cases, a pendant light has a built-in dimmer or transformer. This is often attached in the ceiling cap of the pendant light. In the Lightswing® there is no space to attach the ceiling cap and the dimmer. It is therefore not possible to attach a pendant lamp with a built-in dimmer or transformer to the Lightswing®. The Lightswing® can be used with a wall dimmer!

As you can see, the three steps are practical choices you must make. This way you know what a suitable pendant light for the Lightswing® must meet. It is up to you to choose a beautiful pendant light that fits perfectly with your interior. And at the Lightswing® of course! Order your Lightswing® here.

Discover Lightswing®

Check if your ceiling is suitable for the Lightswing®

Are you wondering whether the ceiling in your house is suitable for the Lightswing®? In this blog we tell you per ceiling type whether or not it is suitable for attaching the Lightswing®.

Lightswing Single white mounted under skylight
Lightswing and pendant lamp hanging from an ornament on the ceiling

A thatched ceiling

Is there wood or plaster above the reeds? Make sure you screw the Lightswing® into the wood / plaster with the right plugs and screws. Does your thatched ceiling have no extra support (wood or plaster) under the reeds? Then it is unfortunately not possible to attach the Lightswing® to a thatched ceiling. Reed is not sturdy enough to carry the Lightswing® with the pendant lamp.

A concrete ceiling

A concrete ceiling is certainly suitable for attaching the Lightswing®. You cannot fully attach the Lightswing® to the central box, so keep in mind that you have to drill 4 holes in your concrete ceiling to be able to attach the system properly. For this we supply a handy drilling template in the Lightswing® package. So nothing can go wrong!

A wood or plaster ceiling

A wooden ceiling or a plaster ceiling is also suitable for the Lightswing®. If you have a plaster ceiling with no further support underneath (wood, for example), it is extra important to use the right plugs and screws. Make sure that the plugs go all the way through the plaster. So, the plug expands not only in the plaster, but also at the top of the drywall.

A sloping ceiling

It is possible to attach the Lightswing® to a slightly sloping ceiling. For this it is best to use a Lightswing® Twin. The Twin has an adjustable foot at both ends of the Lightswing®, so you can set the Lightswing® to the ceiling on both sides. Note: make sure that your pendant light does not hang at the lowest point. The Quick Release to which the lamp is attached is not locked in the Lightswing®. If the lamp is too heavy or the slope is too slanted, the Quick Release can come loose.

A ceiling with an ornament

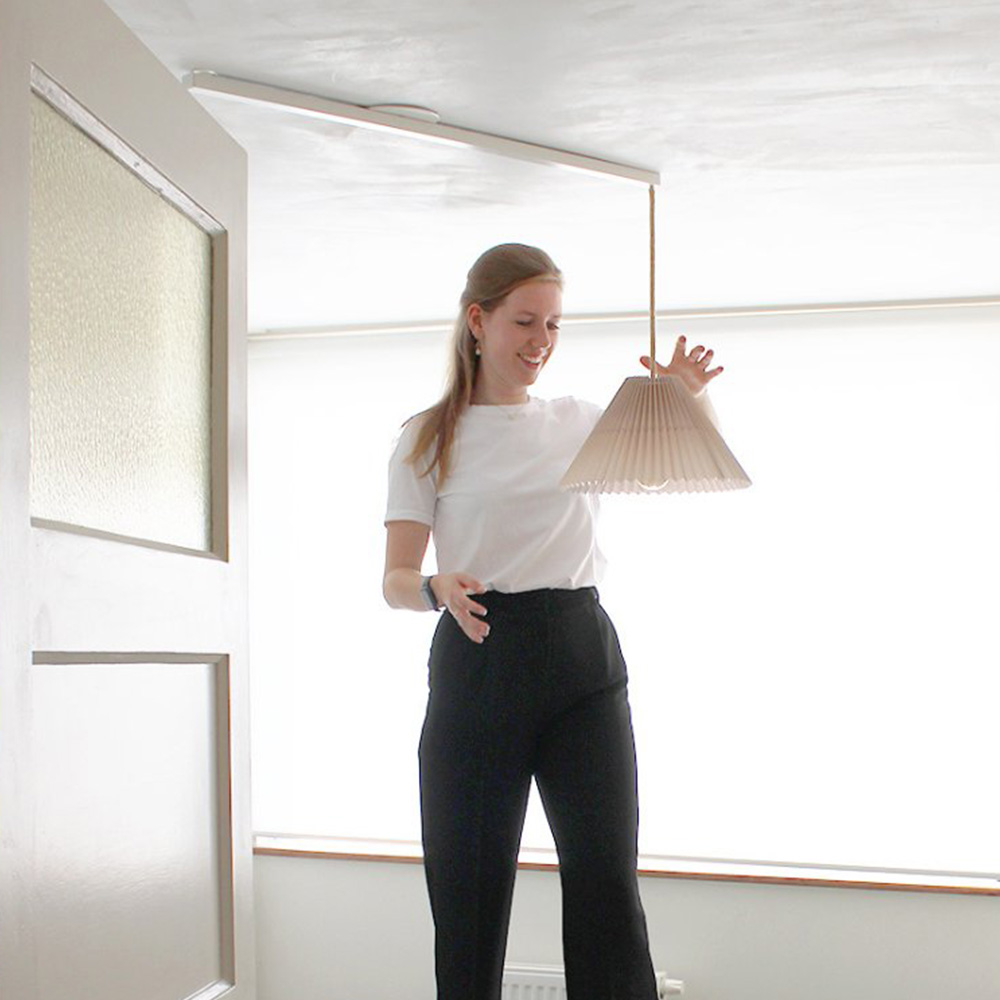
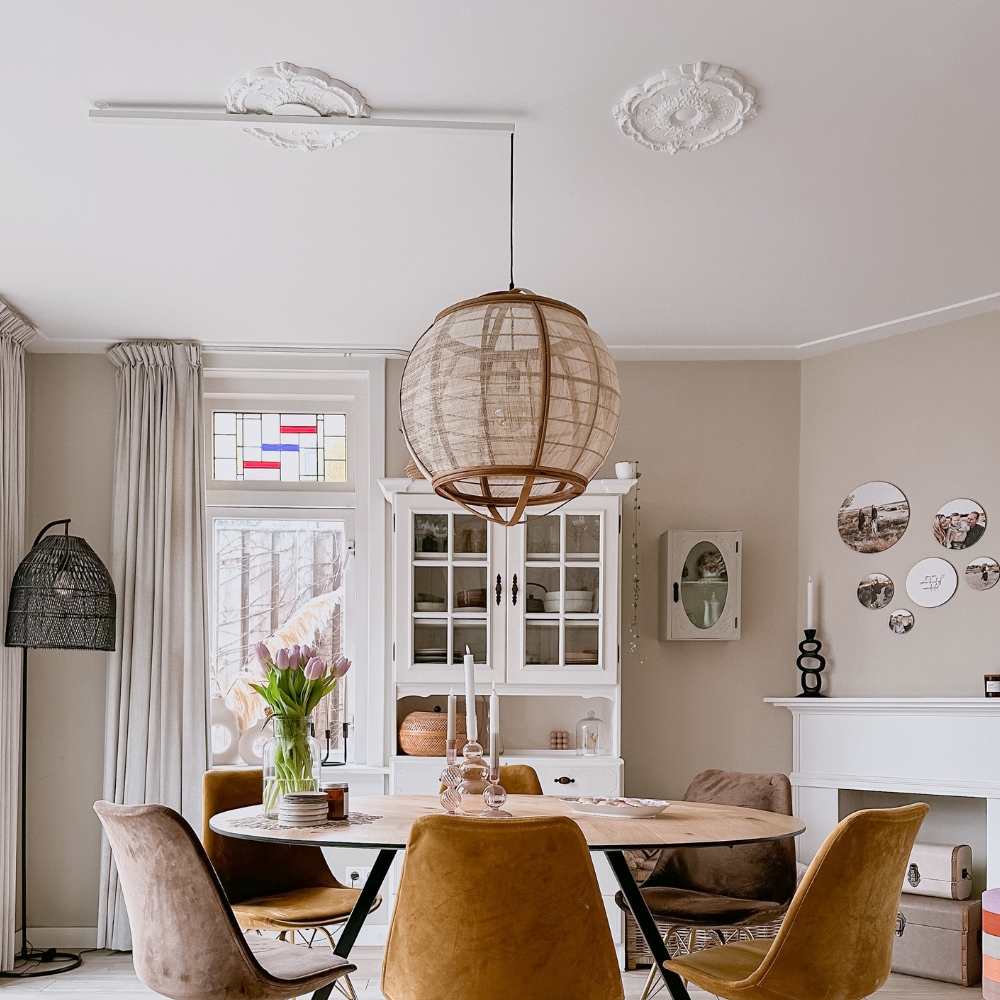
It is possible to attach the Lightswing® to an ornament. With the help of the Lightswing® you can easily move the pendant lamp to the right place without loose cables hanging from the ornament. Use the mounting ring for this. This allows the Lightswing® to rotate and slide freely, without damaging the ornament.

A beamed ceiling

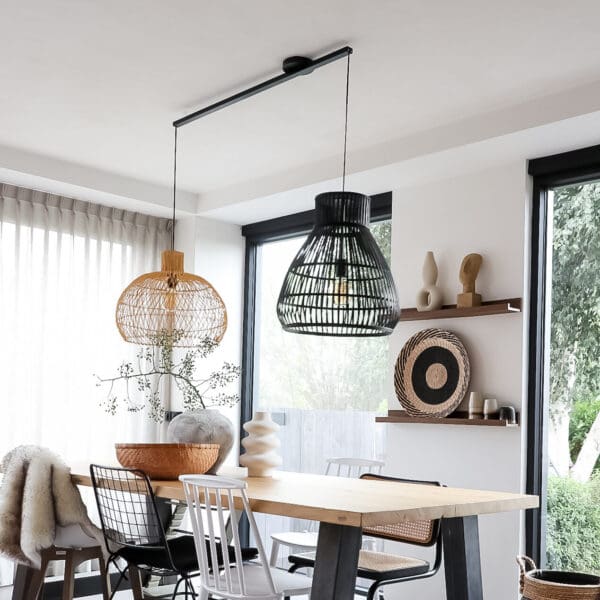
Do you have a beamed ceiling and do you want to attach a Lightswing®? Then there are a number of things you can consider. First of all, it is easiest when you mount the Lightswing® on the beams and not ‘between’ the beams. This gives the Lightswing® plenty of room to slide and rotate. Do you want to place the Lightswing® between the beams? Keep in mind that the Lightswing® does not have complete freedom to slide and rotate.

A skylight ceiling.

With the Lightswing® you can easily place your pendant lamp under the skylight. Connect the Lightswing® over the current light point next to the skylight. Because the system is only fixed at one point and can move freely, even if there is no ceiling above, you can easily place your pendant lamp under the skylight.

The Lightswing® is therefore suitable for almost all ceiling types. Have you already made a choice which Lightswing® you would choose? Check out the Lightswing® Single for one pendant light. Or check out the Lightswing® Twin so you can attach two pendant lights to your ceiling!

Lightswing® mounting: installing the cover plates.

The last step of the Lightswing® assembly is to place the covers. The covers of the Lightswing ensure the best finishing touch, because they cover the screws with which the Lightswing® is attached to the ceiling. In this blog we tell you step by step how you can attach the cover plates to the Lightswing®.

1. Bring the cover plates into position. Remove the covers from each other and bring the two caps each to one side of the Lightswing®.

2. Place cover plates between the ceiling and Lightswing®. Place the two covers with the thickening between the ceiling and the Lightswing®, so that the thickening of the caps falls into the open space of the Lightswing®.

3. Slide the cover plates towards the base plate. Because the thickening of the cover plates ‘falls’ into the Lightswing®, you have enough space to slide the caps towards the base plate of the Lightswing®.

4. Make a rotating motion. When the cover plates almost slide over the base plate, you make a rotating movement. Note that the thickening is still in the gap of the Lightswing®

5. Slide and rotate. Slide and turn the cover plates further inwards, over the base plate. Do this until the covers are facing each other.

6. Press the cover plates together. The last step is clicking the two cover plates together. To do this, press the caps together until they click.

Installing lightswing® covers

When placing the covers, it is important that the Lightswing® hangs nicely straight along the ceiling. This way you have enough space to slide the covers between the Lightswing® and the ceiling. Adjusting the Lightswing® is done with the help of the levelling foot.

Then you check whether the screws with which the Lightswing® is attached are deep enough in their holes. Do the screws stick out? Then the cover plates can be damage when turning the Lightswing®. In that case, screw the screws further into their holes or choose other screws with a smaller head size.

Lightswing® this is how you mount the cover plates
Lightswing accessories Cover caps

Maximize your dining space with flexible pendant light solutions

Do you often find yourself needing help to hang or adjust your pendant light? With a suspension system like the Lightswing® mounted on your ceiling, you gain complete control over your lighting without any assistance. This system revolutionizes how you interact with your pendant lights, making moving, changing, and even temporarily removing the lights a breeze.

Discover Lightswing®
Couple changing pendant lights using Lightswing® twin

Seamlessly move your lamp with your table

Planning to rotate your dining table? No problem! The Lightswing® allows your pendant lamp to move in sync with your table. This advanced suspension system is not just for hanging lamps; its flexible arm means your pendant lamp isn’t restricted to one spot. Choose from models that offer up to 93 cm of movement and the ability to rotate 360 degrees, giving you the freedom to slide your lamp in any direction. This flexibility makes you less reliant on the original lighting position and expands your furniture arrangement options.

Always have the perfect lighting

Beyond its rotation and sliding capabilities, the Lightswing® features a handy Quick Release at the end of the arm, enabling you to quickly connect or disconnect pendant lamps. This feature is ideal for those who love to refresh their space regularly or require varied lighting for different occasions. Whether you need a single lamp or dual lamp setup, the Lightswing® Twin model accommodates both effortlessly.

Right light, right place, every time

The Lightswing® ensures that your lighting is always where you need it to be, perfectly aligned with your dining area. Just pick the color that best fits your décor, and enjoy the right ambiance at your fingertips. 🤩

Shop Lightswing®
Don't just take our word for it!

Hear from our happy customers!

Always keep your lights above the dining table

Adjusting pendant lights to align perfectly above the dining table can be a challenging and time-consuming task. Thanks to innovative suspension systems, this hassle is eliminated, allowing you to effortlessly position a pendant light exactly where you want it. This ensures that your lamps are always positioned correctly, embracing the concept of off center lighting to enhance both function and style.

Lightswing® twin matt black at dining table

Flexible lighting solutions

Whether you’re considering one or two pendant lights above your dining table, modern suspension systems offer unprecedented flexibility. Just as with a conventional pendant light, you just need to install the system once. From there, you can select any pendant light of your choice to attach to the movable arm, which can slide and rotate to any off-center positions you desire, all without the need to drill extra holes in the ceiling.

The Lightswing® Twin is perfect if you require two hanging lamps, offering the same easy setup and versatile adjustment capabilities. This adaptability is ideal for achieving optimal off center lighting, where you can adjust the lights’ positions according to specific needs or decorative changes.

Easily alternate lamps for any occasion

Such suspension systems not only simplify the installation process but also enhance the functionality by making it easy to swap lamps or adjust their positions. This feature is particularly useful during events or when you need to clear the space; the lights can be repositioned or temporarily removed with minimal effort. Additionally, if you decide to rearrange the dining area, adjusting the lights is straightforward, ensuring they always illuminate the table perfectly, regardless of its position in the room.

Why choose Lightswing®?

There are numerous reasons to opt for this type of lighting setup—whether you choose the Lightswing® Single for one lamp or the Lightswing® Twin for two, you’ll enjoy both ease and versatility in your home lighting design. Explore all the possibilities of off center lighting with these innovative designs and transform how you light up your dining space.

The Lightswing® colour for your interior

Which Lightswing® colour do you want? Does the colour and material of the Lightswing® fit well with your interior? And more importantly; does your pendant lamp match the Lightswing®? We are happy to help you choose the right Lightswing®, so it fits in with the rest of your interior.

Discover Lightswing®

The Lightswing® matt black

Do you have an industrial pendant light that you want to transform into a real eye-catcher on your ceiling? Combine them with the matt black Lightswing®!  The Lightswing® matt black 9005 is industrial, graphic and a frequently seen colour in the house. The wonderful thing about this matted Lightswing® is that it really holds the attention. By matching the colour of the cord and the suspension system, the Lightswing® becomes a design item in your interior.

Shop Lightswing®
Kitchen with a Lightswig Twin black in a diningroom with big pendant lights

Lightswing® Stainless steel

A Lightswing® in stainless steel combines well with wood and concrete. Are those materials featured in your interior? Then the Lightswing® stainless steel is a great option for you. Stainless steel elements can often be seen in the kitchen, in chair or table legs or in a lamp fitting. The stainless steel Lightswing® is a stylish addition to these elements. Also, stainless steel gives your interior a timeless and modern look. Just attach a wooden lamp to the Lightswing® and you are done!

Shop Lightswing®
Lightswing Single RVS in a reading corner.
Lightswing Twin RVS in a white interior with two people at the dining table.

The Lightswing® matt white

When matching your matt white Lightswing®, it is important to first look at the colour of your ceiling. Chances are that the Lightswing® matt white RAL9016 blends perfectly with your ceiling colour. The colour of the lamp cord of the pendant lamp also has an important role.

The Lightswing® is at its best when it matches to your pendant lights. It also gives your interior a fresh look. So do you have lamps with a light lamp cord? Go for the matt white Lightswing®!

Shop Lightswing®
Lightswing single white diningroom beige
A woman hangs a pendant light on the Lightswing Single white

So, do you already know which Lightswing® colour you want? Take a good look at all the colours or get inspired and look inside different interiors where a Lightswing® hangs. Get inspired at our   ‘look inside at’  page.

How to easily move your dining table lamp

Turn or move a dining table? There is a good chance that the lamp above the table is no longer in the right place. That’s not convenient. Where you normally reluctantly slide your table back, this is no longer necessary with the Lightswing®. When moving your furniture, your pendant lamp will simply move with you from now on!

Move your lamp with your dining table.

Do you decide to turn the dining table a quarter? The pendant lamp above the dining table simply moves thanks to the Lightswing®. The suspension system for pendant lamps. Because of the flexible arm of the Lightswing®, your pendant lamp is no longer tied to one place on the ceiling.

Discover Lightswing®
Spit photo with the Lightswing in the diningtable showing you can turn your table and the lightswing turns with it.

Maximize flexibility

Depending on which Lightswing® you choose, your pendant lamp can be moved up to 93 cm. In addition, the Lightswing® can also rotate 360°. This way you can literally slide the pendant lamp in all directions. With the Lightswing® you are therefore a lot less dependent on the original location of the light point. You also create many more possibilities to change your furniture. 

Always a nice pendant lamp above the dining table 

In addition to the possibility to rotate and slide your pendant lamp, the Lightswing® provides flexibility in your interior in another way. Because the Lightswing® has a handy Quick Release at the end, you can easily disconnect and attach a pendant lamp. This makes it super easy to change your pendant lights. Do you also want to be able to switch between one or two pendant lights? That’s possible with the Lightswing® Twin! 

With the Lightswing® you always have the right lamp, in the right place! Just choose the right colour. Discover all available colours! 

Shop Lightswing®