Enjoy your Lightswing® right away
So you have time to think about it
We'll prepare your order the same day
Enjoy your Lightswing® right away
So you have time to think about it
We'll prepare your order the same day
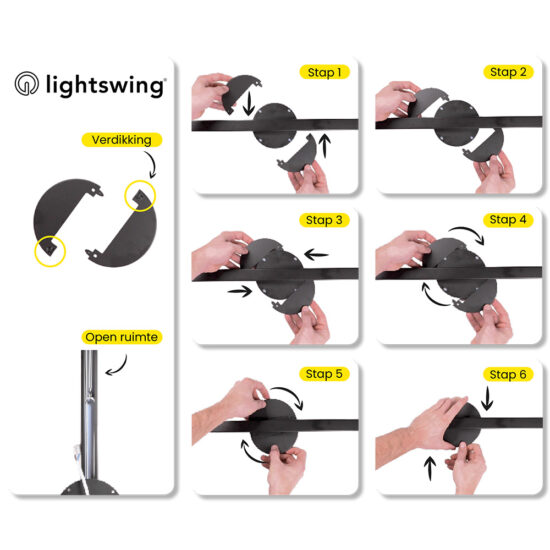
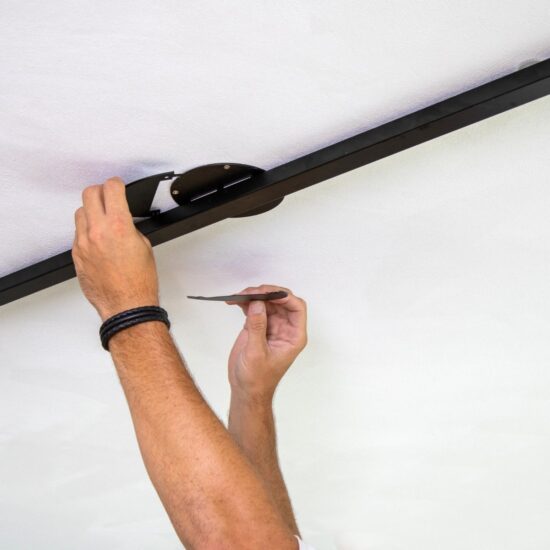
The last step of the Lightswing® assembly is to place the covers. The covers of the Lightswing ensure the best finishing touch, because they cover the screws with which the Lightswing® is attached to the ceiling. In this blog we tell you step by step how you can attach the cover plates to the Lightswing®.
1. Bring the cover plates into position. Remove the covers from each other and bring the two caps each to one side of the Lightswing®.
2. Place cover plates between the ceiling and Lightswing®. Place the two covers with the thickening between the ceiling and the Lightswing®, so that the thickening of the caps falls into the open space of the Lightswing®.
3. Slide the cover plates towards the base plate. Because the thickening of the cover plates ‘falls’ into the Lightswing®, you have enough space to slide the caps towards the base plate of the Lightswing®.
4. Make a rotating motion. When the cover plates almost slide over the base plate, you make a rotating movement. Note that the thickening is still in the gap of the Lightswing®
5. Slide and rotate. Slide and turn the cover plates further inwards, over the base plate. Do this until the covers are facing each other.
6. Press the cover plates together. The last step is clicking the two cover plates together. To do this, press the caps together until they click.
When placing the covers, it is important that the Lightswing® hangs nicely straight along the ceiling. This way you have enough space to slide the covers between the Lightswing® and the ceiling. Adjusting the Lightswing® is done with the help of the levelling foot.
Then you check whether the screws with which the Lightswing® is attached are deep enough in their holes. Do the screws stick out? Then the cover plates can be damage when turning the Lightswing®. In that case, screw the screws further into their holes or choose other screws with a smaller head size.

